http://mondorescue.org/
http://mondorescue.org/docs/mondorescue-howto.pdf
Following instructions are for CentOS 7 (64-Bit).
First we need to cd to /etc/yum.repos.d and download the MondoRescue repository:
When the repository was added, let’s install Mondo using yum:
Now we have two options, we can either run the Mondo Rescue in an interactive manual format, or use the command line to do so. I’ll briefly cover both methods.
Interactive Mode
SSH to your servers as a “root” user and run a mondoarchive command:
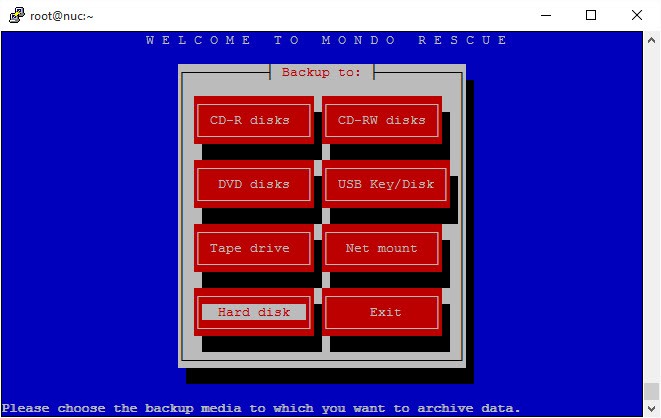
Once executed, you’ll see a following interactive screen. Use arrow buttons and enter button of your keyboard to select the backup destination for your .iso image.
Typically you’d want to backup to a Hard disk or a USB key:
Follow rest of the instructions. You’d be asked to:
- enter the full path name to the directory for your ISO Images
- type of compression (bzip2,bzip, gzip or lzo)
- how much compression (I usually select maximum)
- size of each ISO image in MB – I typically use the default DVD size (4480)
- name of ISO image file (this can be any file name)
- what parts of file system you want to backup (paths can be separated by ‘|’ character) – I’ll typically use an option ‘/’ which is a full OS backup
- option to exclude the file system that should not be in the backup (also separated by ‘|’ for multiple paths) – note: “/tmp” and “/proc” are always excluded
- enter temporary directory path (here I usually just type ‘/tmp’) – this is where the temporary files are created during backup
- scratch directory path (leave on the default setting)
- backup extended attributes (just press enter here)
- select YES to Verify your backup
- when you come to question about a ‘stable standalone Linux Kernel’ just click “Yes”
- Select “Yes” to proceed further. This is where backup with start and depending on the size of your Centos install it may take anywhere from minute to hours to complete.
As you see, instructions are very self explanatory and you shouldn’t run into any issues following them.
Command Line Mode
SSH to your servers as a “root” user and run a mondoarchive command similar to this one.
Note: you’ll need to adjust it to your needs:
Above command will do following:
-O – Means: Do a backup.
-V – Instructs Mondo to verify the results.
-i – Select .ISO image backup as a form of backup format.
-s – Size of ISO images – In my case 4480 is a DVD size.
-d – The destination where each ISO image file will be saved. In my case: /mnt/windows/share_data (this is a windows network share mounted into Centos 7 and also the destination for my backups). If you want to learn how to mount a windows drive to Linux, follow these step by step instructions on How to mount a windows share on CentOS 7 (RHEL). In any case, you can create a backup into any folder on the existing drive (same drive that’s being hot backed up) – just make sure to later exclude that destination from a backup.
-I – Specifying ‘/’ (same as in the interactive mode) will back up the whole system (with exception of excluded paths).
-E – This is what you want excluded from a backup and that is typically the destination of a backup, so in my case: /mnt/windows/share_data
-T – location of the temp directory. I usually point to /tmp folder which is by default also excluded from a full system backup.
-9 – Instructs Mondo to use maximum compression (this can be any value, but maximum compression will result in the smallest possible ISO images).
Note, if you want to create an incremental backup instead of a full backup, add additional option switch to above line:
-D – This will instruct Mondo to create a differential backup on top of original full backup created using options above.
—
Once entered into terminal, you’ll see similar screens to these. Attaching couple of screenshots:

Once you enter above command (edited to your liking), backup with start and depending on the size of your Centos install it may take anywhere from minute to hours to complete.
Scheduled backups using command line and cron:
As you can imagine, the biggest advantage of running in a command line mode is the ability to schedule a backup using cron job.
All you need to do is to create a simple backup.sh application shell script and save it somewhere in Linux your file system:
Once backup.sh is created, schedule it using a cron job. To add it to your cron jobs, simply type the following command in the Linux shell prompt:
and add in the line:
Above means: Run backup.sh script at 1:00 am on every day of every month. Or in other words:
- 0: Minute (0-59) – 0 minute
- 1: Hours (0-23) – at 1 AM
- *: Day (0-31) – of every day
- *: Month (0-12 [12 == December]) – of every month
- *: Day of the week(0-7 [7 or 0 == sunday]) – of every day of the week
- + path to where I’ve saved the script: /home/backup.sh
You can adjust this to your liking.
If you’re using Webmin, it’s even easier, simply schedule it like this to run Daily (at midnight):

Restore from .ISO Image
Now that we’ve created an .ISO backup of our entire CentOS 7 Linux in either interactive of manual (command line) mode (instructions above), you’re probably asking how to go about restoring the system from the image in case you need to do a disaster recovery.
You have couple of options to do this. You can either:
- restore entire system
- or only restore the files and folders you want
In any case, all you have to do is to burn all of the .ISO images created during backup onto DVDs and then insert the first .ISO disc into the DVD drive. As soon as the Linux boots from the first .ISO DVD, you’ll be greeted by the following options:

As you can see, your restore options are: NUKE, INTERACTIVE, COMPARE and EXPERT.
NUKE
Option ‘NUKE’ is a bare metal restore. This is a fully automated restore in which the hard drive and all its file-systems will be completely destroyed and re-created from the backup to the exact same state it was backed up from.
INTERACTIVE
Another option is to type: ‘INTERACTIVE’ and select what you want to restore: full automatic restore, one or more files or folders – interactively, or run a compare only.
Mondoarchive in interactive mode looks like this:

COMPARE
This option will not restore anything – it’ll just compare current OS to the one in your backup (thus called: compare). This is the option to choose in order to verify the viability of your backup or to also discover which files have changed since the last backup.
EXPERT
EXPERT mode allows you to enter into a command line mode and completely control every aspect of the restore – while it gives you the most options, it’s too complicated to be covered in this article.
2. Relax-and-Recoverhttp://relax-and-recover.org/
This quick start guide will show you how to run Relax-and-Recover from the git checkout and create a bootable USB backup.
Start by cloning the Relax-and-Recover sources from Github:
git clone https://github.com/rear/rear.git
Move into the rear/ directory:
cd rear/
Prepare your USB media. Change /dev/sdb to the correct device in your situation. Relax-and-Recover will ‘own’ the device in this example.
This will destroy all data on that device.
sudo usr/sbin/rear format /dev/sdb
Relax-and-recover asks you to confirm that you want to format the device:
Yes
The device has been labeled REAR-000 by the ‘format’ workflow.
Now edit the ‘etc/rear/local.conf’ configuration file:
cat > etc/rear/local.conf <<EOF
### write the rescue initramfs to USB and update the USB bootloader
OUTPUT=USB

### create a backup using the internal NETFS method, using 'tar'
BACKUP=NETFS

### write both rescue image and backup to the device labeled REAR-000
BACKUP_URL=usb:///dev/disk/by-label/REAR-000
EOF
Now you are ready to create a rescue image. We want verbose output.
sudo usr/sbin/rear -v mkrescue
The output I get is:
Relax-and-Recover 1.13.0 / $Date$
Using log file: /home/jeroen/tmp/quickstart/rear/var/log/rear/rear-fireflash.log
Creating disk layout
Creating root filesystem layout
WARNING: To login as root via ssh you need to setup an authorized_keys file in /root/.ssh
Copying files and directories
Copying binaries and libraries
Copying kernel modules
Creating initramfs
Writing MBR to /dev/sdb
Copying resulting files to usb location
You might want to check the log file for possible errors or see what Relax-and-Recover is doing.
Now reboot your system and try to boot from the USB device.
If that worked, you can dive into the advanced Relax-and-Recover options and start creating full backups. If you USB devices has enough space, initiate a backup using:
sudo usr/sbin/rear -v mkbackup3. Dump/Restore
http://serverfault.com/questions/490747/copy-entire-centos-server-to-another
- Make sure your existing system is fully up-to-date (
yum update). - Install a minimal CentOS installation of the same version and architecture on the new hardware. You will need to keep the same number of partitions on the same mount points, though they can be different sizes, on different devices, etc.
- Quiesce the existing system (ie, boot to single-user, and bring up the network).
- Boot the new system off rescue media (install media, in rescue mode), and have the recently-installed partitions mounted. Give it a temporary address on the network. Ensure that root can
sshin. - For each partition on the old/new system pair:
dumpe2fs 0f - /partition | ssh root@newbox "cd /partition; restore2fs rf - ." - Run
grub{,2}-install /dev/sdaor as appropriate, on the new system. - Delete
/etc/udev/rules.d/70-persistent-net.ruleson the new system. Ensure that the contents of/etc/fstabon the new system are consistent with the new hardware. - Reboot the new system (the network will not come up).
- Log into the new system, look at the NICs that have appeared, and ensure the contents of
/etc/sysconfig/network-scripts/ifcfg-*are consistent with the interface names and MAC addresses on the new hardware. - Reboot. Fix all the remaining problems.
4. rsync
1. Boot source and target machines on live USB/CD
Any live USB/CD should be OK.
On the target computer, you will need a tool to partition your hard drive, like gparted.
rsync is also required for data transfer: it’s included in many live systems.
On the target computer, you will need a tool to partition your hard drive, like gparted.
rsync is also required for data transfer: it’s included in many live systems.
2. Partition your target hard drive
Use a tool like gparted to partition the target hard drive, with the same partitions as your source system (slash, swap, home…).
I recommend you to assign LABELs to your partitions: for the fstab, it’s easier than UUIDs.
I recommend you to assign LABELs to your partitions: for the fstab, it’s easier than UUIDs.
3. Mount all partitions on both machines
On both systems, open a root terminal. Then, for each data partition (you can ignore swap):
mkdir /mnt/slash
mount /dev/sdaX /mnt/slash
If you have a home partition:
mkdir /mnt/home
mount /dev/sdaY /mnt/home
4. Transfer the data (network or usb)
This part may be tricky. Choose the method you prefer.
Network
- Setup the network. Test the connectivity with ping command.
The easier is to plug the PCs on a DHCP network (like your ISP box) so that you get automatic IP addresses. If you linked the 2 pcs with a single cable, you’ll have to setup the IPs with NetworkManager (static ips, or adhoc network). - On source system, as root, create a simple
/etc/rsyncd.conffile:uid = root gid = root use chroot = no [all] path = / - Then start the rsync daemon server:
rsync --daemon - On target PC, for each partition:
rsync -avHX SOURCE_IP::all/mnt/slash/ /mnt/slash/
Don’t forget ‘/’ at the end of paths.-awill preserve many file attributes like owner and permissions,-Hwill preserve hardlinks if any,-Xwill preserve extended attributes like setuid. You may also add-Aif you are using acls. What is good with rsync is that you can stop and restart the transfer whenever you want.
USB
Prepare a USB drive with a BIG ext4 partition.
- Mount the USB partition on source system (
mount /dev/sdbX /mnt/usb) - For each partition:
rsync -avHX /mnt/slash/ /mnt/usb/slash/
- umount, unplug and remount the USB disk on the target system.
- For each partition:
rsync -avHX /mnt/usb/slash/ /mnt/slash/
5. Change fstab on target system
As root, edit
For each partition (including swap), replace the first field with the new UUID or LABEL (it’s straightforward with LABELs):
/mnt/slash/etc/fstabFor each partition (including swap), replace the first field with the new UUID or LABEL (it’s straightforward with LABELs):
UUID=the-long-uuid, or LABEL=yourlabel
2 ways to get the UUIDs / LABELs:
ls -l /dev/disk/by-uuid/
blkid /dev/sdaX
6. Reinstall Grub
We will use a chroot (changed root environment) to be able to call the grub install inside the migrated system.
First, bind mount some system directories needed by grub, then chroot:
mount --bind /proc /mnt/slash/proc
mount --bind /sys /mnt/slash/sys
mount --bind /dev /mnt/slash/dev
mount --bind /run /mnt/slash/run
chroot /mnt/slash
Then install grub in the Master Boot Record of your hard drive, and update grub config file (with the new uuids…):
grub-install /dev/sda
update-grub
7. Reboot target machine
That’s it! Your system should be working on the new computer now.
Feel free to comment if you encounter problems.
Feel free to comment if you encounter problems.
No comments:
Post a Comment